Disclaimer: Before I continue, I need to say that I have no hate for any characters, everything I post is strictly based on my opinions and thoughts in terms of the tactics and strategies of the game.
Also, there might be some words that you might not understand from this article, these are terms we used in the game,
Beefy - Strong stats
Ramp - Effects that allows you to roll more dice
Ping - Dealing damage to a character
Pump - Additional stats to a character
Spill damage - Damage from overcrush
Swarm - Having way more characters in the field than your opponent and attacking with all of them. Not to be confused with the Swarm Keyword.
Basic Action Cards

This action is quite versatile, you can use it on a one man wrecking machine or you could pump all your characters. Either way, you need to make sure you have a one man powerhouse or a wall of characters for this action to be effective.

This has the same effect as Thrown Car BAC from the AVX set.

This action card is best use in a Turtles team. Since your opponent can't use the effect against you. Once used, it prevents non-Turtles character from blocking, so essentially you can rush with your Turtles. The global is very unique, you can just pay a bolt and whoever is declare as a blocker will be dealt 1 damage, this will be effective if your characters have overcrush. For 3 cost, it's a decent action for the Turtles team.

This is another good action especially for the Turtles Team, for 2 cost to pump a character +2A is decent, if it's a Turtle, it gets +2D as well. You can use it on unblockable characters or overcrush for the extra damage.

This action is great if you want to counter a high cost character, however, if the action has no burst, it might not help you to get rid of any character you want. On the double burst face, you can send that character die into the bag instead to weaken your opponent's next roll. As great as the effect can be, it wouldn't be efficient if you were to use a 5 cost action to counter a 2 cost character, so there is definitely a risk in using this action if you want to rely on it.

Before I start, I need to say that a 1 cost basic action is amazing because you can definitely buy 1 with any energy during your first turn. On the other hand, the effect allows you to gain life, which is great, you never know when you need the extra life. The global allows you to gain life as well, so this card is great if you encounter an opposing team that relies purely on non-combat damage. All this effect for only 1 cost, that's really a good bargain.

This is similar to Force Beam basic action from AVX set.

This is similar to Gearing Up basic action from AVX set.

This is similar to Take Cover basic action from AVX set.

This is a total counter to a character that has overcrush. What's great about it is that it has continuous and it is only a 2 cost.
Character/ Action Cards

Let's start off this set with April. She is an ally and nothing too powerful for her ability. However, for a 2 cost, she has a potential of 5D, if you are able to flip it with Ant Man or Kal L global, that's 5A! Her ability allows her to pump another sidekick or Turtles +1A, She could support the Turtles team or she can just be part of your sidekick team. With that stats and cost, she is definitely worthy for a sidekick combo.

This version of April is almost similar to the previous one, but instead of pumping attacking, this one pumps defense instead. If you want to be aggressive, the other version is definitely better, if you want to be more defensive, use this one instead.

For a higher cost, this version of April is only good if you are using the Turtle combo. If you have non-sidekick or non-Turtles dice in your bag, it will make her ability less useful. So if you are non playing a Turtles combo, don't use this version of her.

Baxter Stockman is powerful if you are using Mousers. However, for this version, you need to consider the fact that you are using a 4 cost character to ramp selective dice. To fully make use of the cost, when you field Baxter Stockman, 3 Mousers dice must be in your used pile, and that is not easy to set up and if you don't set it up that way, it won't be cost efficient. So I would suggest you to use other characters instead that can provide better ramp ability.

This is a stronger version of Baxter Stockman, that +2A to your Mousers will make a huge difference, and making them free to field will help save you some energy in the long run. With Baxter around, your Mousers can be very powerful.

Mousers are 3 cost at most, so for you to purchase a 5 cost Baxter Stockman, then fielding him and paying another 1 cost to purchase a Mousers die and roll it isn't very cost efficient. You are only able to do it once for every Baxter fielded, so if you really want to use Mousers, just purchasing them directly, that would save you some trouble.

Bebop and Rocksteady are buddies for life, they get their abilities only when each other is active. Bebop is a more defensive character, those additional stats will make him even more durable. So do play Rocksteady if you are using Bebop.

For a way higher cost, this version of Bebop allows you to reroll your Bebop as many time until you get a character face if Rocksteady is active. The ability is not bad as you are guaranteed to get a character face if you want to trigger his ability, however, with Parallax global in play, you don't need to spend 6 cost to buy this version just to guarantee a character face, you can just use a cheaper version and use Parallax global to reroll, plus, apart from rerolling him as many times, Bebop doesn't have any other ability, so it's a little bit expensive for his ability.

For 5 cost and a character with high defense, it is not really wise for Bebop to have a fielding ability, even if he can exit the field, he can only deal your opponent 1 damage upon being fielded and only if Rocksteady is active. That is not worth 5 cost.

For a 2 cost ability, Casey Jones can be your life healer. It is not hard to convert a character into a villain, so you can just convert the character he engaged into a villain and heal you 1 life. If you are into healing, you can consider this version.

This ability is crazy, you can force any number of sidekicks and villains to block Casey Jones, with all the villain converters available, you can convert all your opposing character into villain, and force them to block Casey Jones and leave your other attackers unblocked. What is even crazier is that he is only a 2 cost, so this is definitely one of the reason why you should buy this set.

For a higher cost, Casey Jones' ability is less powerful, but still decent. In the early game, he will be unblockable, but in the late game he might not be useful unless you can convert all your opposing character into villains, but even if you could, that would be a costly move. I would still prefer to use the previous version.

The first Turtle in the set, the guy good with machine, here comes Donatello! Donnie has a decent stats, but it surely isn't worth 4 cost, if you can make the cost cheaper, then it's worth considering.

This version of Donnie reduces the cost of other Turtles character dice, so you can make the other turtles cheaper to buy. If you intend to buy a lot of Turtles for your game, then this card would be helpful.

This version of Donnie allows you to spin up your other Turtles 1 level when they are fielded, so they are guaranteed to be at least level 2, if they enter the field at level 3, you can ramp a die. This is a good supporter, but you need to make sure that you know how to make use of the Turtles at a higher level or you will be wasting your resources.

For a 2 cost character to have Swarm is not a bad ability given that there are no other Bolt characters with Swarm, yet. However, the max die is 3 so your swarm effect may not be as effective. So you might want to reconsider that.

This version of Foot Ninja is crazy if you are using a sidekick combo. It gains additional stats for each other sidekick dice in the field, and it is a sidekick itself, so it you use a flying sidekick combo, the Foot Ninja would be unblockable as well. This is really sick and will be a great attacker in a sidekick team.

This version of Foot Ninja is more supportive and defensive. It helps your other sidekick dice gets +1A while blocking so they can knock out opposing character's easily. That 1A could make some difference in some scenario but the previous version is way more powerful if you want to build a sidekick combo.

For a 3 cost vanilla card, the stats is decent, but not the best vanilla card. I would recommend you to take a look at other versions.

This version of Fugitoid is more of a controller. However, for him to be useful, you have to convert your opposing characters into villain if they aren't one, and your opponent can just pay 1 energy to ignore it's effect, so you will end up spending those energy for nothing. Plus, it affects you as well so it might just back fired.

This version of Fugitoid is more usable, it helps you to pump your Turtles team or Villains. Quite decent for a 4 cost, so you can consider including him into your Turtles or Villains team.

This version of Krang is a great villain supporter. You can attack with an unblockable character and convert it to a villain if it isn't already one, then use Krang's ability to roll it, there's a 50% chance it can go to the prep area. A little reliance on luck but if your luck is great, you can keep on placing that unblocked die into your prep area every turn.

I honestly don't think Krang needs to be regenerated given his huge defense stats. You can consider using him as a good blocker as he is hard to get knocked out. And even if he does, he has a chance to come back into the field.

The fielding ability is crazy, it moves all your opponent's sidekick dice into his/her bag, so your opponent's bag will be flooded with weak dice. The issue here is that he is 7 cost and he is very hard to exit the field. If you can resolve both issues, then he will weaken your opponent each time he is fielded.

Leo is the leader in Blue. This version of Leo is pretty simple, defensive stats and decent attack value, but again, unless you can make him cheaper, it's very costly to buy him at 4 cost with no other abilities.

This is a more reliable Leo, he is the team supporter here. You can go aggressive with another Turtle and if that turtle gets knocked out, you can instead knock out Leo and gain life. To make this card efficient, you need to gain as much life as you can, if possible, 2 life every turn.

This version of Leo is a cost reducer for the other turtles, however, for 6 cost to reduce other Turtles by only 1 cost is a bit expensive, you might want to use other Turtle's cost reducer card or simply buy them at their printed cost.

The next Turtle in line is the party dude! Mikey has a stronger attacker value, so he is definitely best being the attacker in the Turtles team. Similar issue with all the Turtles vanilla card, you need to either make them cheaper or use other versions of them.

This is another version of Mikey and also another cost reducer. If you need to support the other Turtles, then use Mikey as the cost reducer.

This version of Mikey is more supportive in an offensive way. You can have a Mikey die active and use another Turtle to attack, if that Turtle is blocked, spin Mikey up a level, if Mikey is already at level 3, then knocked out a blocking character die. This can help a character with overcrush to deal a lot of spill damage over time. 6 cost might to expensive, but if you can use him well, it's worth it.

There's 2 ways you can use this version of Mousers. You can knock out an opposing character with a fielding ability or you can knock out your own character with a fielding ability to trigger it's ability again next turn. The ability is more than decent, if you pair it with Baxter Stockman, it will be worth the 3 cost.

If you need Mousers for it's stats, then this version will be suitable for you. Your opponent will highly likely to have an active character with fielding ability, so your Mousers will get the bonus stats, if you have Baxter Stockman active, your Mousers can have a potential 6A 6D, and that's from a 2 cost character!

This version of Mousers is decent given that any character that it engages with have the chance to get rolled into energy, thus leaving the fielding to the prep area. If you plan to use this, make sure that it is well pumped by Baxter Stockman and give it overcrush, you might have the chance to do full spill damage to your opponent.

Ralph is cool but rude and he does have pretty decent stats, the problem is that there is another version of him that has an ability and the same purchase cost, so use that instead.

This version of Ralph helps you if your other Turtles are aggressive, that 1 damage dealt can be harmful to your opponent if use correctly. This definitely helps an overcrushing attacking Turtle.

Another cost reducer Turtle, so it's another option for you to use if you want to build a Turtle team.

The partner for Bebop is here. Rocksteady is the powerhouse of the duo, he is very powerful when Bebop is around. Give him overcrush and he can deal some lethal damage if Bebop is active.

If you don't wish to use action cards to give Rocksteady overcrush, how about possessing overcrush is Bebop is active. This version of Rocksteady can be very deadly since it takes no damage from blocking character if Bebop is active. The drawback is the stats is relatively low at level 1, you can pump him up to deal more spill damage.

If you want to knock out an opposing character, you can use other method, using a 5 cost character to do so it's very costly, and the target character he knocks out must be level 1, which decrease the credibility of the card.

If you have ways to gain life and your opponent doesn't, Shredder can help you over time as your health remains the same while your opponent's life depletes every turn.

In a full constructed format, you probably won't see a Turtle because if a player wants to use a Turtle, he/she would use all 4, if it's hard for Shredder to trigger his ability is a constructed environment.

A fielding ability on Shredder is not a good idea, he has really impressive stats so it's a pity for him to exit the field just to trigger his ability next turn. Also, to make full use of his ability, you need to have a lot of villain die in your used pile to make his ability worthy. To me, I find his ability great but his cost being too expensive.

Splinter has a really great stats but his ability is weak. The additional pump is strong instead of an active ability, it's a fielding ability, so you need to make full use of the pump when you field Splinter. For 5 cost just to pump your bolt and fist character for a turn is not really appealing.

For a 6 cost fielding ability, you need to draw a die and hope that it's a bolt or fist die in order to deal 2 damage to a character die, nah...

This is a more usable version of Splinter. You need to build your bolt and fist team until you can guarantee that you can finish your opponent off when you field Splinter. This will take some effort to build, but if you can pull it off, you can finish your opponent in a turn.

Besides the 4 Turtles, you need Master Splinter to support them. This version of Splinter can give them a temporary boost when he is fielded. You need to make use of the pump because it only last until the end of turn. You also need to pump as many Turtles as possible to make full use of the 5 cost character's ability. It's not easy, that's what I can tell you.

For 6 cost fielding ability, you can only ramp a die if you draw a mask or shield character. There are better ramps out there.

This is a powerful version of Splinter. Instead of supporting bolt and fist, this version supports your mask and shield characters. Apart from that, your Turtles gain overcrush. So if you are playing Turtles team, when Splinter is fielded, Leo and Donnie is unblockable while Mikey and Ralph gains overcrush, now that's how you kick some butts using the Turtles.
Conclusion
The Turtles set is really amazing, I mean as a whole, the cards might not be the strongest but it has a lot of usable cards, it is bundle with a collector's box so you have an immediate storage for this set. There are some cards that are really usable in any games, but the usable ones will outnumber them, so it's a great a value if you buy the whole set. For collectors, it makes your life so much easier, all you need to do to complete this set is simply buy the collector's box. If you are not a TMNT fan, you can consider buying the set for the good cards. I hope my review helps and thanks for reading.
Swarm - Having way more characters in the field than your opponent and attacking with all of them. Not to be confused with the Swarm Keyword.
Basic Action Cards

This action is quite versatile, you can use it on a one man wrecking machine or you could pump all your characters. Either way, you need to make sure you have a one man powerhouse or a wall of characters for this action to be effective.

This has the same effect as Thrown Car BAC from the AVX set.

This action card is best use in a Turtles team. Since your opponent can't use the effect against you. Once used, it prevents non-Turtles character from blocking, so essentially you can rush with your Turtles. The global is very unique, you can just pay a bolt and whoever is declare as a blocker will be dealt 1 damage, this will be effective if your characters have overcrush. For 3 cost, it's a decent action for the Turtles team.

This is another good action especially for the Turtles Team, for 2 cost to pump a character +2A is decent, if it's a Turtle, it gets +2D as well. You can use it on unblockable characters or overcrush for the extra damage.

This action is great if you want to counter a high cost character, however, if the action has no burst, it might not help you to get rid of any character you want. On the double burst face, you can send that character die into the bag instead to weaken your opponent's next roll. As great as the effect can be, it wouldn't be efficient if you were to use a 5 cost action to counter a 2 cost character, so there is definitely a risk in using this action if you want to rely on it.

Before I start, I need to say that a 1 cost basic action is amazing because you can definitely buy 1 with any energy during your first turn. On the other hand, the effect allows you to gain life, which is great, you never know when you need the extra life. The global allows you to gain life as well, so this card is great if you encounter an opposing team that relies purely on non-combat damage. All this effect for only 1 cost, that's really a good bargain.

This is similar to Force Beam basic action from AVX set.

This is similar to Gearing Up basic action from AVX set.

This is similar to Take Cover basic action from AVX set.

This is a total counter to a character that has overcrush. What's great about it is that it has continuous and it is only a 2 cost.
Character/ Action Cards

Let's start off this set with April. She is an ally and nothing too powerful for her ability. However, for a 2 cost, she has a potential of 5D, if you are able to flip it with Ant Man or Kal L global, that's 5A! Her ability allows her to pump another sidekick or Turtles +1A, She could support the Turtles team or she can just be part of your sidekick team. With that stats and cost, she is definitely worthy for a sidekick combo.

This version of April is almost similar to the previous one, but instead of pumping attacking, this one pumps defense instead. If you want to be aggressive, the other version is definitely better, if you want to be more defensive, use this one instead.

For a higher cost, this version of April is only good if you are using the Turtle combo. If you have non-sidekick or non-Turtles dice in your bag, it will make her ability less useful. So if you are non playing a Turtles combo, don't use this version of her.

Baxter Stockman is powerful if you are using Mousers. However, for this version, you need to consider the fact that you are using a 4 cost character to ramp selective dice. To fully make use of the cost, when you field Baxter Stockman, 3 Mousers dice must be in your used pile, and that is not easy to set up and if you don't set it up that way, it won't be cost efficient. So I would suggest you to use other characters instead that can provide better ramp ability.

This is a stronger version of Baxter Stockman, that +2A to your Mousers will make a huge difference, and making them free to field will help save you some energy in the long run. With Baxter around, your Mousers can be very powerful.

Mousers are 3 cost at most, so for you to purchase a 5 cost Baxter Stockman, then fielding him and paying another 1 cost to purchase a Mousers die and roll it isn't very cost efficient. You are only able to do it once for every Baxter fielded, so if you really want to use Mousers, just purchasing them directly, that would save you some trouble.

Bebop and Rocksteady are buddies for life, they get their abilities only when each other is active. Bebop is a more defensive character, those additional stats will make him even more durable. So do play Rocksteady if you are using Bebop.

For a way higher cost, this version of Bebop allows you to reroll your Bebop as many time until you get a character face if Rocksteady is active. The ability is not bad as you are guaranteed to get a character face if you want to trigger his ability, however, with Parallax global in play, you don't need to spend 6 cost to buy this version just to guarantee a character face, you can just use a cheaper version and use Parallax global to reroll, plus, apart from rerolling him as many times, Bebop doesn't have any other ability, so it's a little bit expensive for his ability.

For 5 cost and a character with high defense, it is not really wise for Bebop to have a fielding ability, even if he can exit the field, he can only deal your opponent 1 damage upon being fielded and only if Rocksteady is active. That is not worth 5 cost.

For a 2 cost ability, Casey Jones can be your life healer. It is not hard to convert a character into a villain, so you can just convert the character he engaged into a villain and heal you 1 life. If you are into healing, you can consider this version.

This ability is crazy, you can force any number of sidekicks and villains to block Casey Jones, with all the villain converters available, you can convert all your opposing character into villain, and force them to block Casey Jones and leave your other attackers unblocked. What is even crazier is that he is only a 2 cost, so this is definitely one of the reason why you should buy this set.

For a higher cost, Casey Jones' ability is less powerful, but still decent. In the early game, he will be unblockable, but in the late game he might not be useful unless you can convert all your opposing character into villains, but even if you could, that would be a costly move. I would still prefer to use the previous version.

The first Turtle in the set, the guy good with machine, here comes Donatello! Donnie has a decent stats, but it surely isn't worth 4 cost, if you can make the cost cheaper, then it's worth considering.

This version of Donnie reduces the cost of other Turtles character dice, so you can make the other turtles cheaper to buy. If you intend to buy a lot of Turtles for your game, then this card would be helpful.

This version of Donnie allows you to spin up your other Turtles 1 level when they are fielded, so they are guaranteed to be at least level 2, if they enter the field at level 3, you can ramp a die. This is a good supporter, but you need to make sure that you know how to make use of the Turtles at a higher level or you will be wasting your resources.

For a 2 cost character to have Swarm is not a bad ability given that there are no other Bolt characters with Swarm, yet. However, the max die is 3 so your swarm effect may not be as effective. So you might want to reconsider that.

This version of Foot Ninja is crazy if you are using a sidekick combo. It gains additional stats for each other sidekick dice in the field, and it is a sidekick itself, so it you use a flying sidekick combo, the Foot Ninja would be unblockable as well. This is really sick and will be a great attacker in a sidekick team.

This version of Foot Ninja is more supportive and defensive. It helps your other sidekick dice gets +1A while blocking so they can knock out opposing character's easily. That 1A could make some difference in some scenario but the previous version is way more powerful if you want to build a sidekick combo.

For a 3 cost vanilla card, the stats is decent, but not the best vanilla card. I would recommend you to take a look at other versions.

This version of Fugitoid is more of a controller. However, for him to be useful, you have to convert your opposing characters into villain if they aren't one, and your opponent can just pay 1 energy to ignore it's effect, so you will end up spending those energy for nothing. Plus, it affects you as well so it might just back fired.

This version of Fugitoid is more usable, it helps you to pump your Turtles team or Villains. Quite decent for a 4 cost, so you can consider including him into your Turtles or Villains team.

This version of Krang is a great villain supporter. You can attack with an unblockable character and convert it to a villain if it isn't already one, then use Krang's ability to roll it, there's a 50% chance it can go to the prep area. A little reliance on luck but if your luck is great, you can keep on placing that unblocked die into your prep area every turn.
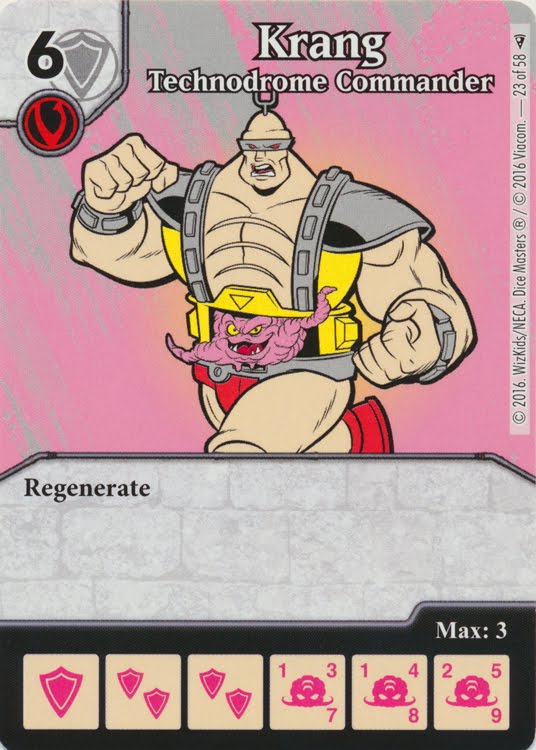
I honestly don't think Krang needs to be regenerated given his huge defense stats. You can consider using him as a good blocker as he is hard to get knocked out. And even if he does, he has a chance to come back into the field.

The fielding ability is crazy, it moves all your opponent's sidekick dice into his/her bag, so your opponent's bag will be flooded with weak dice. The issue here is that he is 7 cost and he is very hard to exit the field. If you can resolve both issues, then he will weaken your opponent each time he is fielded.

Leo is the leader in Blue. This version of Leo is pretty simple, defensive stats and decent attack value, but again, unless you can make him cheaper, it's very costly to buy him at 4 cost with no other abilities.

This is a more reliable Leo, he is the team supporter here. You can go aggressive with another Turtle and if that turtle gets knocked out, you can instead knock out Leo and gain life. To make this card efficient, you need to gain as much life as you can, if possible, 2 life every turn.

This version of Leo is a cost reducer for the other turtles, however, for 6 cost to reduce other Turtles by only 1 cost is a bit expensive, you might want to use other Turtle's cost reducer card or simply buy them at their printed cost.

The next Turtle in line is the party dude! Mikey has a stronger attacker value, so he is definitely best being the attacker in the Turtles team. Similar issue with all the Turtles vanilla card, you need to either make them cheaper or use other versions of them.

This is another version of Mikey and also another cost reducer. If you need to support the other Turtles, then use Mikey as the cost reducer.

This version of Mikey is more supportive in an offensive way. You can have a Mikey die active and use another Turtle to attack, if that Turtle is blocked, spin Mikey up a level, if Mikey is already at level 3, then knocked out a blocking character die. This can help a character with overcrush to deal a lot of spill damage over time. 6 cost might to expensive, but if you can use him well, it's worth it.

There's 2 ways you can use this version of Mousers. You can knock out an opposing character with a fielding ability or you can knock out your own character with a fielding ability to trigger it's ability again next turn. The ability is more than decent, if you pair it with Baxter Stockman, it will be worth the 3 cost.

If you need Mousers for it's stats, then this version will be suitable for you. Your opponent will highly likely to have an active character with fielding ability, so your Mousers will get the bonus stats, if you have Baxter Stockman active, your Mousers can have a potential 6A 6D, and that's from a 2 cost character!

This version of Mousers is decent given that any character that it engages with have the chance to get rolled into energy, thus leaving the fielding to the prep area. If you plan to use this, make sure that it is well pumped by Baxter Stockman and give it overcrush, you might have the chance to do full spill damage to your opponent.

Ralph is cool but rude and he does have pretty decent stats, the problem is that there is another version of him that has an ability and the same purchase cost, so use that instead.

This version of Ralph helps you if your other Turtles are aggressive, that 1 damage dealt can be harmful to your opponent if use correctly. This definitely helps an overcrushing attacking Turtle.

Another cost reducer Turtle, so it's another option for you to use if you want to build a Turtle team.

The partner for Bebop is here. Rocksteady is the powerhouse of the duo, he is very powerful when Bebop is around. Give him overcrush and he can deal some lethal damage if Bebop is active.

If you don't wish to use action cards to give Rocksteady overcrush, how about possessing overcrush is Bebop is active. This version of Rocksteady can be very deadly since it takes no damage from blocking character if Bebop is active. The drawback is the stats is relatively low at level 1, you can pump him up to deal more spill damage.

If you want to knock out an opposing character, you can use other method, using a 5 cost character to do so it's very costly, and the target character he knocks out must be level 1, which decrease the credibility of the card.

If you have ways to gain life and your opponent doesn't, Shredder can help you over time as your health remains the same while your opponent's life depletes every turn.

In a full constructed format, you probably won't see a Turtle because if a player wants to use a Turtle, he/she would use all 4, if it's hard for Shredder to trigger his ability is a constructed environment.

A fielding ability on Shredder is not a good idea, he has really impressive stats so it's a pity for him to exit the field just to trigger his ability next turn. Also, to make full use of his ability, you need to have a lot of villain die in your used pile to make his ability worthy. To me, I find his ability great but his cost being too expensive.

Splinter has a really great stats but his ability is weak. The additional pump is strong instead of an active ability, it's a fielding ability, so you need to make full use of the pump when you field Splinter. For 5 cost just to pump your bolt and fist character for a turn is not really appealing.

For a 6 cost fielding ability, you need to draw a die and hope that it's a bolt or fist die in order to deal 2 damage to a character die, nah...

This is a more usable version of Splinter. You need to build your bolt and fist team until you can guarantee that you can finish your opponent off when you field Splinter. This will take some effort to build, but if you can pull it off, you can finish your opponent in a turn.

Besides the 4 Turtles, you need Master Splinter to support them. This version of Splinter can give them a temporary boost when he is fielded. You need to make use of the pump because it only last until the end of turn. You also need to pump as many Turtles as possible to make full use of the 5 cost character's ability. It's not easy, that's what I can tell you.

For 6 cost fielding ability, you can only ramp a die if you draw a mask or shield character. There are better ramps out there.

This is a powerful version of Splinter. Instead of supporting bolt and fist, this version supports your mask and shield characters. Apart from that, your Turtles gain overcrush. So if you are playing Turtles team, when Splinter is fielded, Leo and Donnie is unblockable while Mikey and Ralph gains overcrush, now that's how you kick some butts using the Turtles.
Conclusion
The Turtles set is really amazing, I mean as a whole, the cards might not be the strongest but it has a lot of usable cards, it is bundle with a collector's box so you have an immediate storage for this set. There are some cards that are really usable in any games, but the usable ones will outnumber them, so it's a great a value if you buy the whole set. For collectors, it makes your life so much easier, all you need to do to complete this set is simply buy the collector's box. If you are not a TMNT fan, you can consider buying the set for the good cards. I hope my review helps and thanks for reading.