Note: I have no likes or dislikes towards any characters, gear or spells. My review is strictly based on my opinion in terms of the card's playability in the game.
New Keyword
Basic Action Card

For a 2 cost action, this effect is very powerful. With all the dice ramping ability and global, being able to put a die that your opponent just place in his/her prep area into their used pile will surely affect their game.

This is another 2 cost action that can come in handy. If you need a character to stay in the field yet be very aggressive, then this action is meant for that. Or if you want a blocking character to stay in the field, you can use it on that die as well. The global is nothing special given that Agent Venom global is much better but it might come in handy, and it comes with the card.

This is the new distraction, and the action effect is actually usable. Although the effect can be countered by the global, but imagine you have 8 attacking characters, your opponent probably wouldn't have that many reserved energy to distract them all, so he/she will definitely block some of them, and for each of your characters that is blocked, they deal 1 damage to your opponent from this action, for a 2 cost, this is simply amazing.

How unlikely that a basic action is a gear card. If you are using characters that can use gear, this action will benefit you more. Having more defence is not a bad thing and if your opponent doesn't use characters that can equip gear, you don't have to be afraid that he/she would buy this action before you do. This will occupy one of your BAC slots, but if you have better characters or action to use in, then it wouldn't be a problem.

This action may seems ridiculous to some of you. Why would you make your characters pay an energy to attack, that makes no sense! Well, you could play this action first before fielding a character. So you have a potential chance to knock out all your opposing character with 1 defence and then you field a character that you want to attack with this turn. This works perfectly with overcrush, even if you have to, you just need to pay 1 energy to attack while your opponent needs to pay multiple energy to declare blockers to absorb minimal damage. This will affect his/her game play, as your opponent needs to keep energy to block your characters, wasting your opponent's reserve energy is going to affect them in the early game or games with no dice ramping effect.

A 5 cost basic action may be very costly, but this action is definitely worth the cost. The fact that it is a continuous action makes it even better. It is a very defensive yet offensive action, if your opponent can somehow win the game by attacking with all his/her characters, you can use this action as a last resort to knock out some attacker so you get to live another turn. Similarly, you can use this action to clear your opponent's field and hopefully end the game on your next turn. A 5 cost continuous action is definitely worth it.

Equip this sword to a character and give that character overcrush, that would deal some damage. For 4 cost and an equipment that is powerful, I think it's worth it for your gear team. Also, it doesn't benefit your opponent if he or she doesn't play characters that can wear gear.

In a constructed format, your opponent would most likely have a lot of sidekick dice in their used pile because of Professor X global, so this action would be very powerful if you decide to give a character a one time boost. The global is nothing special since Magic Missile global can do the same thing but requires only 1 bolt.

For a 5 costs basic action and can only knock out level 3 characters on a double burst face doesn't seems very appealing. The global could help you knocked out beefy characters but it only affects level 1 characters. Unless you can spin opposing characters down as and when you can, I suggest you to use other basic action instead.

A 2 cost basic action to ping at a character is slower than using a bolt from Magic Missile global. If your team revolves around using Basic action, then this would be more suitable for you, if not, you might want to stick to Magic Missile instead.
Character Card
 Bahamut may not have a dragon in the card title but it certainly does possess the Dragon power. If a 3 breath weapon is not strong enough, how about an overcrush? Let's not forget that it has an ability that can prevent other character from using Breath weapon, so you can use it to counter any dragon team. All of that should make him a force to be reckon with.
A character with such high defence should never have fielding abilities. Bahamut ability is good if your opponent plays Evil Dragon, but that is quite rare in a full constructed tournament. It doesn't have overcrush so exiting the field is hard. I would rather play the common than this version.

An attacking ability on Bahamut is definitely better but the issue is that Evil dragons are not a common Meta that everyone would have in their team. The reason why I would favour the common version is because they are all the same cost but the common version possess overcrush, so even if your opponent doesn't play evil dragon, Bahamut: Dragon of Justice can still be useful in the game.

Balor's stats is great, and having more of it would be good for your team. However, for 7 costs and a fielding ability to recruit more Balor for free seems a little risky. If your rolls are perfect you will have 3 other Balors purchased for free and fielded all 4 in 4 turns. But if your rolls are imperfect, which is likely the case, you will take an even longer time to buy all your Balor dice. A strategy based on pure luck is really risky, so I wouldn't recommend in a competitive play.

This version of Balor has an almost similar effect as the common one but instead of getting more Balor, you can recruit more Fiends. The effect is better as Balor itself is low cost and you have a chance to buy another Fiend that is expensive and powerful for fee. The issue is the same however, it is hard for Balor to exit the field and when it triggers it's ability, there is a chance you might not purchase that die for free. If your intention is to buy a die for free then you might want to reconsider because it is a very risky strategy.
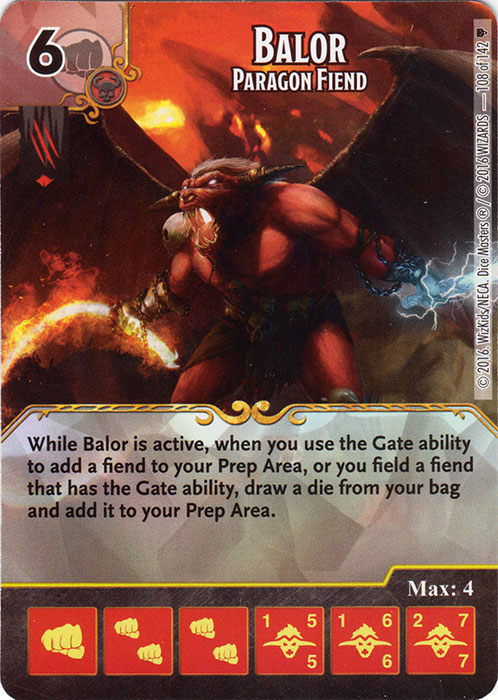
This is a more usable Balor if you are playing a Gate combo. A character with such stats and allows you to ramp die can be valuable in your team.

This is a great version of Beholder. Global abilities are the essentials for the game and being able to use 2 of them for free is a gift. The drawback however, is that Beholder is a little difficult to exit the field, so if you can make it exit the field often, the ability is going to help you in the game. It's global is the same as the one in Battle for Faerun, so it benefits if you are using an action die.
 This is another usable version of Beholder, but this version helps you if you are playing an action combo. However, with Baron Zemo: Thunderbolt around, it decrease the value of this Beholder.
  There are a lot of action die that can knocked out a character. Knocking out all other copies can be deadly if your opponent has all 4 of that die in the field. However, your copies of those characters in the field also gets knocked out if you use this effect. The drawback is that if your opponent doesn't play multiple copies of a character, Beholder is not going to be useful in the field.
  Black Dragon acts as a defensive support for your evil characters. When it being active, you can go aggressive with your Evil characters because they cannot be knocked out. Still, for 7 costs, the ability is not very impressive given that Invulnerability basic action can do the same for your characters, and it doesn't just limit to evil characters.
I think I stressed enough on fielding abilities on characters with high stats, besides, this character's ability benefits if your opponent plays an adventurer combo. If not, you damage dealt is going to be very minimal from a 7 costs character.

This version of Black Dragons benefit if you play a Dragon team against an adventurer team. The odds in a full constructed tournament is very small, so you might not want to take that chance and use this card.

For 2 costs, the ability is decent. That 1 damage might not be powerful but can come in handy. I mean it's a 2 cost, I am just glad that it's not a vanilla card.
 For a 2 cost to get immunity to action die and character's abilities is great. Although your opponent probably wouldn't target it but this immunity can come in handy, and again, I am just glad that it's not a vanilla card.
This is a very versatile Blink Dog, it can be your attacker or blocker. Regardless of which, each time Blink Dog is knocked out, you have a chance to deal 2 damage to your opponent. It is quite easy to get knocked out so you don't have to worry about that. For a 3 cost character to have a chance to deal 2 damage to your opponent is powerful.

This version of Bronze Dragon is simple, if you are playing a dragon combo then you can consider this Dragon. It's stats is quite decent and the breath weapon 1 can combo with your other Dragon, not very powerful but playable.

This is a unique character. Instead of using a dragon combo with the other dragons, this Bronze Dragon simply cancel it. This can be a way to counter a dragon team but the number of energy you will be spending is crazy, you need to reserve an amount of energy to stop your opponent's breath weapon, and if your opponent chooses not to attack, you kind of waste it. Even on it's burst face, it is still costly to use anti breath weapon. If you really want to counter a Dragon combo in the long run, use Bahamut: Dragon of Justice instead.

This is another way to counter a dragon team. Instead of stopping your opponent from using Breath weapon, Bronze dragon simply retaliates. It can hurt your opponent definitely but the problem is if your opponent uses Breath Weapon 6, it can knocked out your Bronze Dragon. I would still prefer Bahamut: Dragon of Justice when it comes to countering a Dragon Team.

This is almost similar to Bronze Dragon: Apprentice Dragon, with the exception that this version has an additional fielding ability. I am not appealed by this card because of the Anti Breath Weapon wasting of energy issue and also the fact that it possess a fielding ability.
 If you want to make use of this Bugbear Ambusher, you need to have effects or abilities that can increase your character's defence to avoid having characters with the lowest defence, even so, the character die that you will end up knocking out would likely be an opposing sidekick. It is not easy to use this character as it takes a lot of strategic planning if you don't want to rely on luck, and for the effect I don't think it's worth your time to make this character work.
  For a 5 cost character to posses it's stats is a little weak, and if you want to move it into the field for defence purpose, you need to pay 2 fist. It is a costly move for a one turn block, and you should spend your energy on someone else.
This version of Bugbear Ambusher relies on luck to be effective. You have a chance to knock out a character once it's fielded, but you also have the possibility of placing this die into your used pile. It's more of a desperate move to survive an attack from a fielding character, and you should never place yourself in such desperate situation, so choose characters that wouldn't prevent the situation instead.

Fabricate is an interesting ability, it allows you to buy a character by sacrificing your character dice in the field. This isn't a bad thing, you can knock out characters with fielding abilities so you have a chance to refield them. This version of Clay Golem is very defensive, it also helps you by taking some damage. Having 2 damage reduced every turn will come in handy, plus if you are using Fabricate to buy this Golem, it is technically 'free', and this 'free' character helps you to absorb damage, so what more can you ask for?

This version of Clay Golem is more protective for your other character dice instead of you. The redirecting of damage from a character die to Clay Golem may seems very little be it can be crucial times, such as your opponent knocking out your low defence blockers and swarm you to win the game or you almost winning the game only for your opponent to knock out that last sidekick. Since he has higher defence, he can take more damage so redirecting to him is not going to be a problem. His ability is optional, so that's another good point about him. He also has the Fabricate ability, so technically you can purchase this die for 'free' as well, worth considering.

This is another defensive version of Clay Golem for your other character dice. What is so great about this is that even though his purchase cost is higher than the other 2 versions, the Fabricate ability still remains the same value. The ability strengthens your character's defence directly, you may think that the drawback is that your characters with fielding ability would have a harder time leaving the field, but with Fabricate combo, they can exit the field if you wish them to. It's worth considering, especially if you decide to play a very defensive team.

Cockatrice may have a little problem exiting the field, but when Ant Man global, that issue will be solved. His ability is not that bad given that a lot of character are 4 costs and below, so knocking them out would benefit you, you could still use Psylocke: Kwannon the Assasin, but Cockatrice is a 4 cost, so he is won't be affected by Zombie Magneto. He is worth considering if you want to knock out characters in the mid or early game.

This is an Anti Sidekick character. However, it works both ways and it is really luck based on whether you knocked a sidekick out or not. Best scenario case is your opponent sidekick gets knocked out while yours survive when you roll for this effect. I won't recommend it if you want to use him to counter sidekick, just purely because it takes luck to knock out a sidekick.

Storm: Ro would be better if you want to knock out a character through engaging in combat. My opponent probably won't use a high cost character to block him, so even if he knocks out someone for his ability, it will most likely be a low cost character. I don't think the ability is worth a 5 costs.

It is similar to Cockatrice: Minion Monstroucity.

While Marvel have the zombie and DC have the Black Lanterns, DND have their Accessories. Deck of Many thing is a luck based ramp effect, if you are lucky, you get to draw and roll 12 additional dice, but that is the extreme level of being lucky, because once you get a wrong named die, you get nothing to ramp this turn. I wouldn't want to play this luck game, although I have a chance to roll 12 additional die, but i have an even higher chance of getting no die to ramp and wasting this action. It is hard to manage your die for this action effect, if you want to increase your odds of drawing the correctly named die, you must make sure that your dice bag have very minimal number of dice, on the contrary, if you have more dice in your bag, your odds drop. Also, if you want to make this action works, you need to have a distinct die of each character and actions in your dice bag, and even with Professor X global, some point in the game you will have more than 1 sidekick die in your bag, and that will not make this action any easier to work. It is not easy to make this action work and even if you can pull it off to ramp 2 die, for a 3 cost to ramp 2 die is not a big deal, there are plenty of other action that can ramp die and you don't have to plan so much to do so. If you want to try your luck with this action, then be my guest.

This version of Displacer Beast is so great, you don't have to worry about getting targeted by your opponent, because each time your opponent do so, he/she takes 2 damage. You can go aggressive or be defensive with this Displacer Beast because your opponent most likely won't try to target it given that he/she will have to take 2 damage to do so. For stats wise, 3 cost character to get a 6 defence that can become 6 attack with Ant Man global is definitely worth it.

This version of Displacer beast is more like a force attack effect on your opponent's character. If a character is annoying you, just force it to attack with Displacer Beast and block with your character with high attack so it can knock that annoying character out. It is not a bad ability, but given that the common version is so much better and cheaper, the uncommon doesn't look too appealing.

This ability of Displacer Beast may not seem very appealing, however, if you work with overcrush characters, it can prove to be very deadly. Overcrush character gets weaken when they have multiple blockers, but Displacer Beast can solve the issue by swapping it around, you can have Displacer Beast getting blocked by multiple characters and the overcrush character getting blocked by the blocker that was supposed to block Displacer Beast, that way the spill damage of the overcrush character increases. Similarly, you can give Displacer Beast overcrush and Ant Man global and swap him with another attacker that has minimal or no blockers. He is one of the good rare in this set.

Drizzt is an adventurer and a character that can equip gear, so his stats have unlimited potential, but depending on your opponent to get good stats isn't a great idea especially if you cannot guarantee that your opponent will have at least 1 evil character in the team.

This version of Drizzt summons a character Guenhwyvar into play instead of boosting his own stats. But to get Guenhwyvar into play, you need experience token, and to get experience tokens you need to knock out monsters, which is not an easy thing to do in a constructed format. In a draft he would be strong but in a constructed format, it is hard to make him usable.

Knocking out a character with Swarm is great, but a fielding ability on Drizzt just defeats the purpose. He is an adventurer and a character that can equip gear, someone that doesn't benefit from getting knocked out and refielding. If you need this character for the stats, the uncommon version is more general while the common is more powerful when your opponent plays Evil character, the super rare seems pretty weak when compared to the other 2.

This version of Dwarf wizard is more aggressive, if you keep using action die, your opponent's field will get weaken. Not forgetting that he also have experience and can wear gear. A pretty decent ability for a 4 cost.

This is a Dwarf Wizard that can get very powerful when you keep using action die. Since he possess the experience ability, you can make him powerful by giving him overcrush and some other action effect and hope he doesn't get knocked out so he gains experience token. He can get very strong and powerful and for 3 costs, he a great character to get ridiculously powerful stats.

This version of Dwarf Wizard is more controlling. You get to blank a target character's die and what's great is that it doesn't affect your characters if you blank that character's text. For a 3 cost to lock out a character's ability permanently is so powerful. This is another good rare to look out for in this set.

This is such a good character, it is only 2 costs and you can field it for free as long as you have energy in your reserve pool. The best part is that you can steal your opponent's energy, you can just spend it on unnecessary globals or use it to assist with your purchase of die, whichever the case, your opponent now loses 1 energy, this will definitely weaken your opponent, maybe not directly, but it will somehow affect him/her.

At a higher cost, this is a more powerful Elf Thief. You get to waste your opponent's non-generic non-wild energy, and at the same time, you may get free energy from your used pile. The drawback is that you need to have characters of the same type in your field to move that energy into your opponent's used pile, and you need to have die showing that energy face in order to retrieve it from your used pile. For a 3 costs, even if you don't fulfill the full effect for this character, it is not hard to have characters of all type of energy characters in your field to waste your opponent's energy.

This is another character that can weaken your opponent when they used a global ability. For a 4 costs to set this kind of rules for global can be deadly. The only drawback is that you cannot use this effect on your opponent's turn, but that's okay, if you need to deal damage every turn for your opponent using global, there's always Wasp: Founding Avengers.

A fielding ability on Erinyes is not that appealing. Similarly to other gate abilities, Erinyes is using luck to get more of her die. I am not a fan of the luck gate combo, you might want to use other 5 costs Fiend that are stronger.

Now this is more like it, you can form a Fiend combo with Erinyes being the one that summons them into the field. She just needs to attack and you can have more Fiend in your field.

This is another Fiend supporter character. However, it is not as good as the uncommon version, placing a Fiend character die into your bag is not a bad thing but it is not as strong as fielding it after buying it.

Fabricate ability sure is strong, Flesh Golem is an addition to that. He is not hard to purchase and can be useful in the early game, but if he were to combo it with the other 2 Golems, you are technically impervious to a lot of damage.

This is more protective version of Flesh Golem for your character die, though alone he may seems very weak but together with the other Golems that can redirect damage from character die, you don't have to fear area attacks anymore.

That 1 defence will come in handy and not to forget that if you fabricate it, it is technically free, so it's a good deal for that protection.

The character can steal your opponent's energy, if he or she have any. It's not a bad ability, but if your opponent doesn't need that sidekick die to play the game, your opponent would be thankful that you captured that sidekick die, as you minimize their odds of drawing a weaker die.

This is another version of Gelatinous Cube, this time, it captures a gear instead. It is very situational in a constructed game to do so, and it is hard to captured a unequipped gear if your opponent plays a gear team.

This version of the cube can be really powerful, but it all comes down to the luck factor. If you pull a good die out of your opponent's game, it can screw his or her game play, if you pull a sidekick die, he or she would be thanking you. Things can go both ways, and it's up to you to see if you are daring enough to play this.

This character counters Adventurers, so if you can predict that your opponent would play that, then use her. Her ability can really weaken an Experienced Adventurer.

This is another counter to adventurers, however it reduces 1 experience token instead. But the second part of the ability can come in handy if your opponent only has Adventurer in the field and Ghost is at level 3.

If you think your opponent would play a pure Adventurer team, then this character would screw all of them up. A lot of adventurers are good guys so she would weaken their experience token when she is fielded. If you don't feel confident about your opponent using Adventurers or you don't play monsters, then you can skip all her cards.

This is a good counter against sidekicks attackers, and it also comes with Swarm, so it's not a bad character.

If your opponent is playing a pure sidekick or ally team, this character will make your opponent suffer. But forcing all your opposing sidekicks to block, it can weaken get rid of their field and reduce the number of opposing blockers for your other attackers. Plus, the global can come in handy if you want to get rid of a character by forcing it to block.

Your Giant Spider can get aggressive or defensive, because either way, it makes your opponent about getting their characters rolled away if they are unlucky. For a 3 cost to provide such issue to your opponent is certainly a good card.

This character is a support for Fiends. Although you need other characters to make a Fiend deck workable, you do need Glabrezu's help, that 1 cost reduction can make a difference.

If you are afraid of your Fiend characters getting knocked out by non-combat damage, then this version of Glabrezu would be helpful. However, there are other ways to knock out your Fiend apart from non-combat damage, so I would rather use a better version of it.

This version of Glabrezu is more expensive. At the same time, it doesn't motivate me enough to use this version, Action die can be deadly but there are a few action effects that can wipe out your characters and doesn't target your characters. Plus, with a higher cost, your Fiend characters are not immune to any other effects and abilities.

Similarly to other Gate Fiend, if you can only purchase this character die, it would be very slow and a lot of reliance on luck, which is something that you don't want to depend on in the game.

Fielding ability on a Gnome ranger is quite decent, that 2 damage can come in handy and it is also an adventurer. For 4 costs, it is usable.

If you want to ramp more die with this character, it may not be such a great idea. Gnome Range has good stats, but for 4 purchase cost and 2 fielding cost to ramp a die, it may be the best idea, you could rely on that level 1 face to make the ability more effective and efficient but what are the odds of that. If you need to ramp a die, use other characters instead.

This is a great supporter for an aggressive team. That 1 extra attack value will come in handy, and it's only a 3 cost to boost your other characters.

For a 3 costs, the ability is quite limited if you want to counter an action die. Not all action die is going to affect your character dice, most of them helps your opponent, and Gnome Ranger cannot counter that, which makes it less usable.

A 2 cost swarm may seems very slow given that Kobold is in the game, but Goblin has a good stats for 2 cost, so it can also equip gears, so with all that and swarm, it should worth the cost.

This version of Goblin is more costly but it comes with an ability. In a constructed play, I don't think that it is worth the extra cost as you won't expect a lot of adventurers, so you might want to stick to the common version.

This ability is not that bad given that you can ramp dice and go aggressive at the same time. You don't need to manage your dice well if you can trigger it's ability. Having an alternate ways to swamp and get more dice is pretty usable.

A fielding ability on Gorgon is not very wise, and the ability to knock out a character die only if you can roll it away makes it even worse. For 5 costs, this is not an a character you want to invest in.

For a higher cost and a less usable version of Gorgon in a constructed format, I will gladly pass.
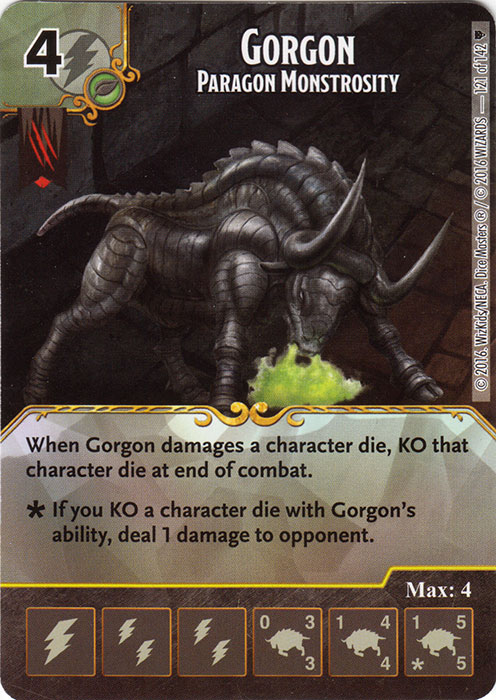
This is a more usable Gorgon, you will get to knock out your opponent dice, so don't be afraid to use overcrush, you could trick your opponent by making a lot of characters block your Gorgon, only for you to give another character an overcrush, then you can split Gorgon damage to it's blocker, all of them will get knocked out. If you are on level 1, you get to deal your opponent 1 damage as well, which is good enough.

This is a supporting Half Elf Bard, and a good blocker. She can ramp at least 1 die for you and if you play an adventurer team, you have a high chance of ramping 2 dice for her ability. For 3 cost and her stats and ability, she is good.

If you can make your Half Elf Bard at level 3 all the time, your other characters are basically immune to opposing character's ability. That alone is really powerful, so try to keep her at level 3 at all time.

If you have different active character die in your field and Half Elf Bard attacks, your attackers can get very deadly with their stats, so aggressive team can consider her in the team. You can include a few low cost character so it wouldn't be hard to get more bonuses for her ability.

In a constructed play, it is hard for Adventurers to gain experience, even though her ability is great that you can revive a knocked out good characters, but if you can't gain experience, there is no use of her ability.

The only character in the game with Cleave. Don't look down on the ability, because it can be very deadly. Just give Half Orc Barbarian overcrush and he will surely be able to trigger his cleave ability. What is so great about Cleaving is that the character you deal damage to for this effect doesn't need to be engaged with him. I consider him a decent character.

In a draft, I would consider this card as 2 experience token on a character is no joke. However, in a constructed event, it is rather hard to knock out monsters so it is very risky if you want to be dependant on this character in a constructed format.

Looking at Half Orc Barbarian's defence, it is not hard to knock him out. You can be aggressive with by attacking normally or give him overcrush, even if he does not deal damage to your opponent, as long as he is knocked out after combat damage resolves, he will deal damage to his blockers, which can easily wipe out the opposing field. On the other hand, he can be a blocker and brings down a beefy attacker with him. He is not a bad character, but I would prefer the common version instead.

If you are intending to play a pure bolt team, this would be a good object for your team. The main effect of this die is great if you have a lot of active bolt characters, you can deal a lot of damage to your opponent with this die or you can use it to deal damage and knock out a target character. The double burst part of it is nothing really special but if you don't feel like poking a character and a player with a bolt, you can use this effect instead. A good super rare and very powerful offense die for a bolt team.

For a 2 cost Fiend character, it is quite decent, but there are other versions of Hell Hound that are stronger, so you might want to use them instead.

If you don't want to play a Fiend team, this version of Hell Hound is still usable, what is so great about it is that it can deal that damage to a character or a player, the options to choose can come in handy, maybe not for an attacking Hell Hound die, but 4 might make a big difference. For 3 cost, this is a great character for early game or aggressive team.
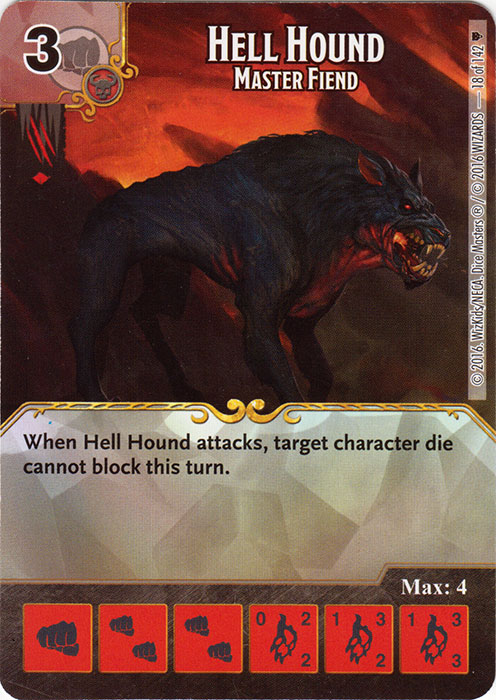
The ability to make a character unable to block is very useful especially in the early game. 4 Hell Hound dice attacking could be a disaster for your opponent, or if at least one of them has an overcrush, it could be the end game for your opponent. This version is definitely playable.
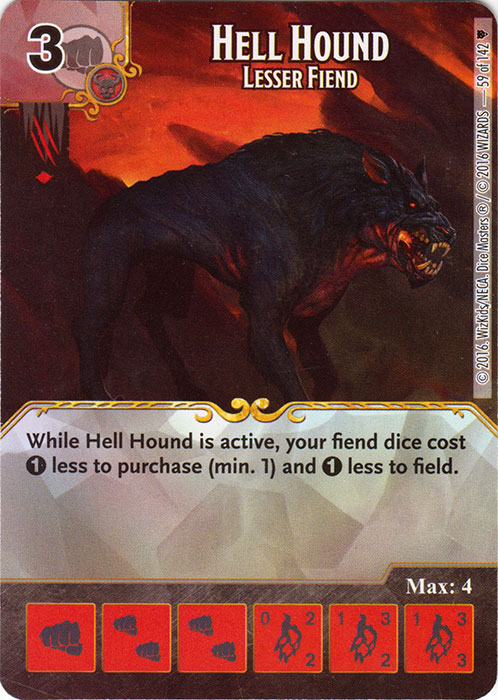
This is a Fiend supporter, for 3 cost it can reduce purchase cost AND fielding cost for Fiend characters. With all other Fiend supporters, don't be surprised that you could buy Fiend characters for 1 cost. This is one of the cheapest Fiend, so if you want to play a Fiend team, you would need this character.

For 2 cost, this character has a really good stats, but the Fielding cost is also very expensive. Giants don't have a synergy right now that you would play all Giants in the same team, so I don't see the need of a Giant with no ability having such expensive Fielding cost. There are other 2 cost character that have equally strong stats for a 2 costs and have lesser fielding cost.

For 3 cost character to get Overcrush is really sick. Hill Giant's fielding cost is really expensive for a low cost character and usually such expensive fielding cost could field characters with even stronger stats. However, since this version has overcrush, you can use global to increase it's attack so it can deal some damage in the early game.

If overcrush is not your thing, how about a Hill Giant that drains your opponent's blocker. In the early game, you can either damage your opponent with unblocked Hill Giant or drain your opponent's blocker with Hill Giant and leave your other characters unblocked. This version of Hill Giant is great because it can be useful in the late game as well.

The second part of Hill Giant's ability is not really a driving point for me to use this version. Hill Giant already possess overcrush, so you can be sure that he will be blocked, and when he is blocked, your other Evil character dice can be blocked as well. If you want to make full use of the ability, at least one of your Hill Giants cannot be blocked, and to do that you probably would use effects or abilities to make your opponent's characters unable to block, but if that is the case, you might just as well play a relentless combo than making use of this version of Hill Giant. If the second part of the ability is not useful, you might as well use the 3 costs version of him that comes with overcrush.

If you are using characters that can equip gears, you might want to use Human Fighter to support them. Reducing their purchase cost by 1 is very helpful, given that most characters are 2 costs, and making them 1 cost is really powerful. Although the ability works both ways, your opponent probably would play the same thing as you in a constructed format so Human Fighter would help you more than him/her.

Gaining more experience tokens in a turn is powerful, but in constructed format, you probably won't see evil adventurers very often, so Human Fighter would not aid you much.

Similarly to the uncommon version, this version of Human Fighter is not easy to trigger his ability in a constructed format as your opponent might not play good adventurers in their team.

This is another character that can drain your opponent's energy. Just field the character and you can move an energy die from your opponent's reserve pool to the used pile, unlike the Elf Thief, you don't spend that energy, you simply move it, so if a die showing 2 energy is in your opponent's reserve pool, you can move it to the used pile with this character. It is not hard to leave the field, so a fielding ability is suitable. Plus, the attack value at level 3 is amazing.

This version of Devourer is not as good as the common version, because it only counters wild energy in your opponent's reserve pool. The chance of your opponent getting wild energy is very slim and if your opponent needs a certain energy to use a global on your turn, and you have this version of Intellect Devourer, they would keep that specific energy instead of keeping wild energy, so don't expect this character to affect your opponent.

This is a more powerful Intellect Devourer, but at a higher purchase cost. If your opponent keeps too many energies in their reserved pool, you can use this character to move all of them away. The only way your opponent can keep energies when you trigger Devourer's effect is by keeping only 1 energy of each type in their reserve pool. This can counter a lot of potential global uses, like mask for Professor X or Distraction, Bolt for Magic Missile, Shield for Transfer Power or Human Paladin etc, if your opponent is forced to keep only 1 or 2 of those energies per turn to use those global, it will affect their game. For 5 costs, this character's stats looks weak, but the effect sure will affect your opponent's game in the long run.

This is the third and last Golem in this set. The fabricate ability is still powerful and this Iron Golem ability is very defensive given that it can absorb up to 3 damage for you every turn. If you have all 3 Golems present, your opponent pretty much cannot deal you any damage each turn.

If you think by absorbing 3 damage from you every turn not good enough, you might want to use this version instead. This Iron Golem helps to absorb the first damage from each source during your opponent's turn, so all their character die and global source deals you 1 less damage on their turn. It might not seems powerful, but imagine your opponent keep dealing you with non-combat damage each turn from different source, it could end your game very soon, if you have Iron Golem active, it would totally spoil their game. If you are going to Fabricate it, I think that the ability is not bad for a free character.

This is probably one of my least favourite Golem, because the Fabrication stays the same while the purchase cost of the character decreases. Still if you combine with the other Golems, you can redirect up to 6 damage from other character die to your Golems every turn. This can counter almost any AOE attacks that is capable of wiping out your board. Playing the Golems depends on your game play, although the fabrication effect is really good, but if you don't choose your Golems wisely, they won't help you much in the game. So plan out your team and see which Golems best suits your team synergy.

Just by looking at the stats of Lich, a 5 costs character isn't that bad. His ability allows him to be at level 3 regardless and characters he engaged with will be nerf down to level 1. This may not seems very powerful but use Ant Man global and overcrush and you will see the damage he can deal. On the other hand, he can nerf an attacker by blocking and draining it, he can easily counter an overcrush character. Not a bad character for 5 costs.

In a draft, this character would be great if you play an evil monster team and your opponent plays a good or neutral team. Unfortunately in a draft, you won't be relying on Lich ability that often.

Similarly to the uncommon version, you won't be able to remove a lot of experience tokens in a constructed format simply because not all your opponents will use them.

This is another character with Swarm, the additional ability is not that bad, but it is only useful in the early game. Simple swarm character that provides a shield energy instead.

If you want to rely on this version of Lizard Folk, then the only die that you can rely on is Lizard Folk in your game, because if you damage your opponent with Lizard Folk, and you drew a non-Lizard Folk die for it's effect, you have to move to the used pile. If that die you drew is a character you need, you would screw your own game. Relying on just one character in a constructed game is risky, and I recommend you don't do that.

This version of Lizard Folk has no swarm but relies more on gear. If you have intend to play a gear team, then you can consider this version of Lizard Folk. The global might could in handy if you decide to use gear in your team.

Lolth ability is not that bad, but the fact that it is 8 cost makes it hard to buy her. It would be more viable to use if her purchase cost is reduced or you don't have to spend an energy to deal your opponent damage when you field an Evil character. The whole process is just costly to deal your opponent damage.

This is a more usable and less costly Lolth. However, to deal your opponent a maximum of 1 damage every turn from a 7 costs character's ability seems a little weak. If your opponent don't wish to take that damage, he/she can just end the attack step. The ability is not that bad but it is just not worth 7 costs.

If you think the other 2 version of Lolth are not powerful, then this one is even less playable in the constructed format. If your opponent plays an adventurer team, then this Lolth would help you greatly, but what are the odds of you facing such opponent in a constructed format.

There are other ways to counter sidekicks, so you don't have to field Oni just to do that. But if you want a cheap character with decent fielding cost and good stats, then you can use him.

This is a great counter against any action die. Not only can you remove an action die in your opponent's field, you can send an action die showing energy in their reserve pool to the used pile or even an action die that he or she just place into the prep area into the used pile. The versatility of the ability against action die makes it useful in any format.

If you want to purchase basic action die for 2 less, you can always use the red dragon global. Using Oni for this effect will not be as effective, because when you field Oni, there is a chance that all basic action die had been purchased before.

Orcus isn't a Fiend, but he certainly makes Fiend characters very easy to purchase. Reducing their cost by 2 is really going to make a big difference. His stats is really beefy as well so you don't have to worry about getting knocked out easily. The global on the other hand can come in handy given that it is a nerf version of the Magic Missile global.

A fielding ability on Orcus is not really a good thing. Plus, his ability is very limited, if no fiend character die is in your bag, you simply waste his fielding ability.

Instead of using the Gate effect, Orcus simply recruits more Fiend as long as he attacks or blocks. Since it is not a fielding ability, you can trigger the ability every turn. If your luck is good, you get to purchase and field the Fiend die immediately. For 7 costs, it is really dependant on luck for his ability, but in this case, it's either go big or go home, you can really flood your field with free Fiend and win the game with them, but you can also waste the ability and end up with nothing.

This action is really a control action against your opponent. It makes your opponent worrying about purchasing too many different die. Unless your opponent have exactly 4 dice in their bag, it will always have this probability that one of their named dice is not the one they drawn and would be sent to the used pile. Draining 1 die from your opponent can cause his or her game. Although this action does not help you to win the game, but it is good enough that it can slow down your opponent with it.

This is an action that provides a one time boost for a character. It may not seem powerful but the good thing is that your opponent cannot purchase it, and if you use red dragon global and you are lucky enough to roll a double bursts for this action, you are technically paying 2 costs for 5A and 5D bonus, which is really worthy.

A 2 cost action is not a bad thing, plus, it gives a character fast. Fast is often underrated. It can protect an attacker from being knocked out and if that attacker possess overcrush, it can prevent it from being knocked out while still being able to knock deal spilled damage.

The effect of the Ring is decent, if your characters has overcrush or unblockable ability, you can use the Ring so it doesn't get distracted or ping by Magic Missile. The more powerful part of the card comes from the global. It is basically trading off an unwanted energy with a sidekick face of your choice. If you desire sidekick, you can field more sidekicks with this global. If you want more energy of a certain type, you can do so. Or if you just want a desired energy to buy something, you can use the global to assist you. This is such a versatile global and it is definitely going to be one of the Meta fix.

Since this version of the ring doesn't have the global, we will have to judge it based on the card effect. When the equipped character attacks, it can deal at most 3 damage to a target character. That might not be a bad ability but if you want to make the best out of it, you need your equip characters to be at level 3 and you need all of them to wear the Ring, which can be a costly move. The action ability is decent but because the global on the other 2 versions are strong, I would rather you use the other 2 versions instead.

An equipped character that can use Regeneration for free is definitely good. Plus the global in available on this card as well. If you have both cards, you see how you would want to make use of the Ring to fit your team. If you just want the global, then just hunt for the common version.

For a 4 costs gear, if you want to use it to save a character, that character must be worth the sacrifice. Apart from it, it doesn't do anything else, it has no other global and only 1 die for you to use for your entire team. It is not a bad gear but it is not that great for you to include it into your team.

For 2 cost character, it is not too bad given that it has no fielding cost. The effect however, is not that playable in a format given that gears will most likely be attached to a character, so you might just waste Rust Monster's ability. But if you just need a 2 cost mask character, feel free to use it in your team.

This is a more usable Rust Monster if you want to counter gears. Knocking them out may not be as good as sending them to the used pile but being able to remove a gear just by fielding this character seems pretty strong. Still it wouldn't be very powerful ability in a full constructed format but feel free to use it because it is cheap.

This version of Rust Monster counters more gear at a time, however, if your opponent's roll is good then you might just waste Rust Monster's ability. If you want to counter Gears and you don't want to take the chance, I suggest you use more uncommon version of Rust Monster instead of using this one.

For Storm Giant's ability, it is not very wise for him to possess a fielding ability, but if you really want to use him, you need to give him overcrush so he can keep exiting the field and have a chance to trigger his ability again on your next turn. Maybe he is not exactly the best Giant, but if you don't mind the trouble, he is actually playable.

For a 6 costs character to deal up to 3 damage to a character is not very appealing, what is worse is that you need to draw sidekick dice in order to do so. You have a chance to filter out some sidekick dice from your bags but at the cost of a 6 cost character and a fielding ability is not the way to go.

A cheaper version of Storm Giant is definitely worth considering. Plus, his ability is now an attacking ability so you can keep triggering every turn without fear. A 5 cost character to deal 2 damage every turn may not seems very powerful but for such stats, it becomes usable in any format.

This is the most powerful super rare in the set. It can be used to counter any character, you just have to knock out one of your sidekick and you can knock out an opposing character, how sick is that? You can also solve the issue where your characters with fielding abilities are having trouble exiting the field. For 5 costs, it is very powerful, it may have only 1 die but that's all you need to counter a character, what's more is that your opponent cannot purchase this die from you.

This is another cheap Dragon that can be included into your Dragon team. This version of White Dragon is more used for blocking but if you need to you can always do some Breath Weapon with it.

This is a more powerful version of White Dragon. If you have a way to spin down all your opponent character to level 1, your characters are basically unblockable for this turn. If you can set up the combo well, White Dragon might just be the character you need to win.

Having a stronger Breath weapon may be attractive but the effect that this version of White Dragon possess is not very powerful compared to White Dragon: Apprentice Dragon. Your opponent might not be playing a Good character team and if he or she doesn't, your White Dragon won't be that useful. And giving your opponent to option to pay 1 energy to ignore your ability just nerf it, even if your opponent plays a Good character team, they can just save 1 energy to counter you.

If you are playing constructed format, this version of White Dragon isn't very useful as it is more expensive and works only against Good characters.

The energy Drain part of this character is the only thing useful in a constructed format. Still, you wouldn't want to spend 4 cost on a character solely for the energy drain ability.

With a more expensive cost and an ability that is hard to pull off in a constructed format, I will pass on this one.

This version of Wraith faces the same issue as the other 2 versions as well, you can't really depend on them in a constructed format as their cost is not reasonable enough for their abilities if you can't get to use them.
Conclusion
I have to say that I am very impressed with this set, it includes bunch of new mechanics for the game. The dice itself is really nice and large improvement from the first DND set. If you are not a DND fan, do go for a few draft or at least get some foil packs to get some useful common and uncommon card. If you are lucky, you might even get a rare. The wording and the help from wizkids forum really helps the player to understand the card effect clearly. If I can say anything about the game, I would say that the game gave me confidence that it will keep improving and do even better for future sets. Hope my review helps and thanks for reading!
No comments:
Post a Comment